
HOME
VIEWING TIPS
Many Windows users like the WMV format. Our WMV clips are 1-3 MB and 320 x 240 pixels (low resolution). Mac users can visit Microsoft Corporation to obtain a Windows Media Player.
The MOV clips can be played on PC's or Macs by most versions of the QuickTime player. Our MOV clips are 2-6 MB and 480 x 360 pixels (medium resolution). Visit Apple Computer, Inc. to obtain QuickTime 6 or 7. Use the left and right arrow keys to advance single frames - a QuickTime advantage.
Our MP4 clips are 2-6 MB and 640 x 480 pixels (high resolution). Based on h.264, they download as quickly as MOV clips but require a fast computer ( > 1 GHz) running Windows 2000/XP or Mac OS X v10.3.9+ and QuickTime 7 to play. Visit Apple Computer, Inc. to obtain or upgrade to QuickTime 7.
The MPG clips can be viewed by almost all media players and Internet browsers. Our MPG clips are 1-3 MB and 320 x 240 (very low resolution) and download quickly.
The RM clips were designed to be played by the Real Player. Our RM clips are 1-3 MB and 320 x 240 pixels (low resolution). Visit RealNetworks, Inc. to obtain a Real player for PC's or Macs.
The SWF clips use the Shockwave plug-in preinstalled on many browsers. Our SWF clips are 1-2 MB and 320 x 240 pixels (very low resolution) and download quickly. Visit Macromedia, Inc. to obtain Shockwave for Macs or PC's.
Choose from 1 to 3 jpegs from some of the DV clips and 6 video formats for every clip. If you use a dial-up modem, look at a picture or download a clip very patiently (expensive if your modem dials long - distance). If you have a broadband connection, click your favorite video format to watch a clip or download it to your hard drive for personal use. Each clip plays about 15 to 30 seconds.
|
For MAPS and information, visit these amazing Web sites: NatureServe Explorer NatureServe InfoNatura AVIBASE Cornell BNA (fee) _________________________________________________ |
|
PHOTOGRAPHING WOODPECKERS AND OTHER WARY WILDLIFE WITH A VIDEOCAMERA Malcolm Mark Swan
©2005 by ManyBirds We invite & encourage webmasters to add ManyBirds clips to their web sites, as follows: |
|
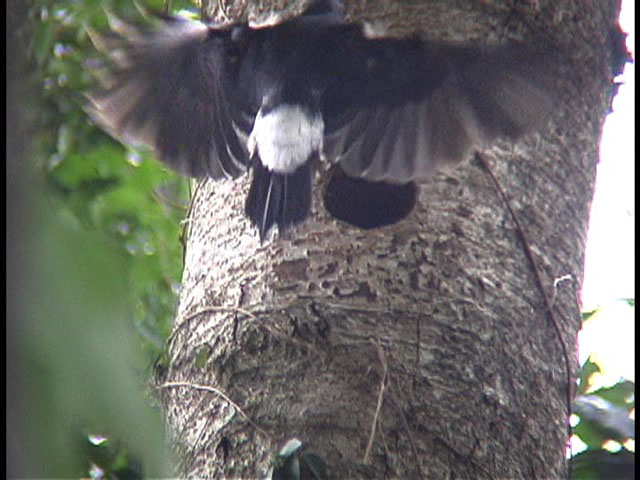
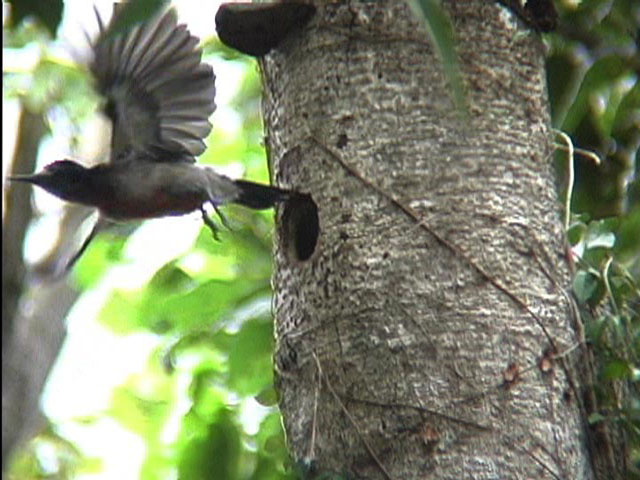
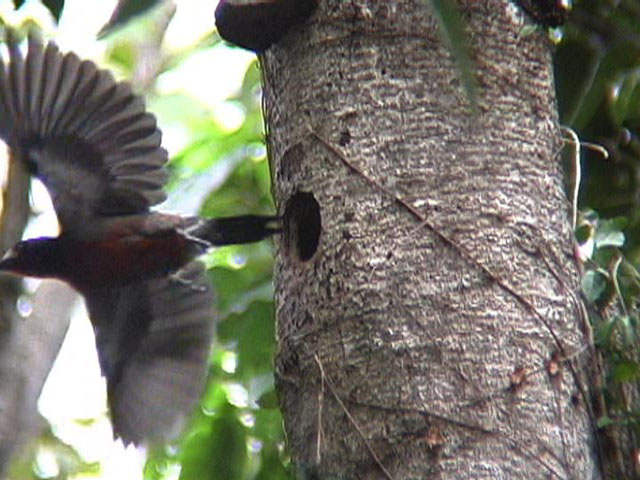
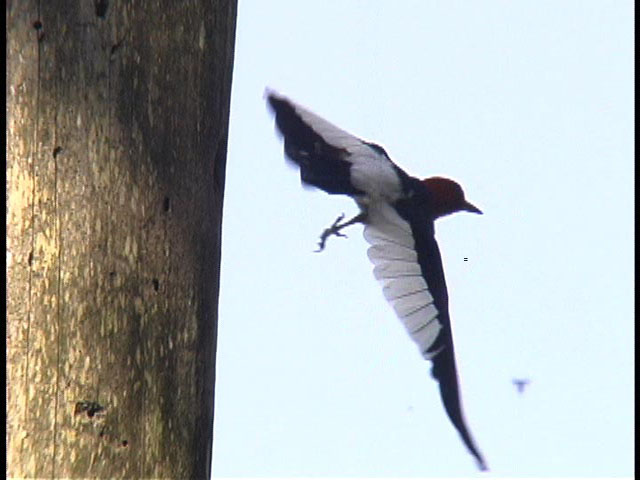
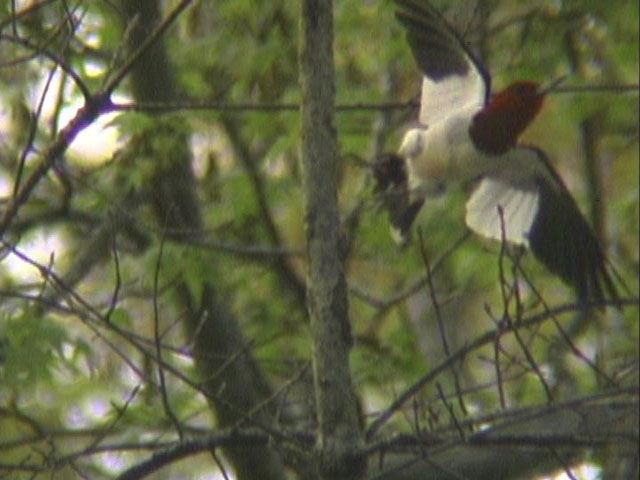
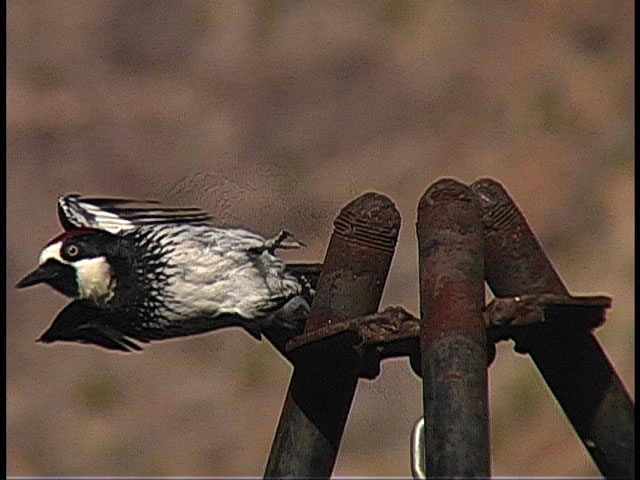
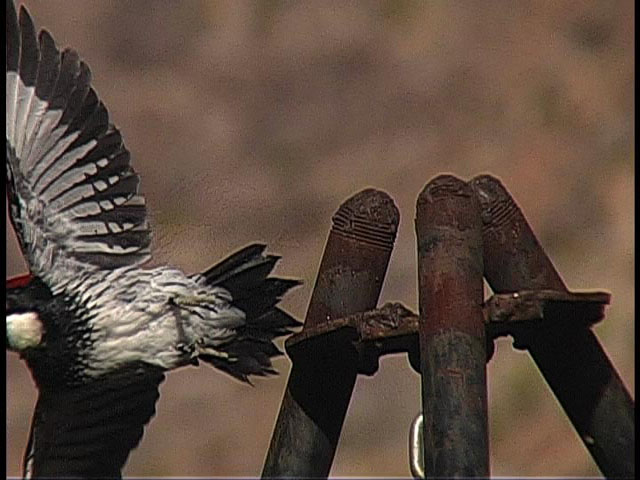
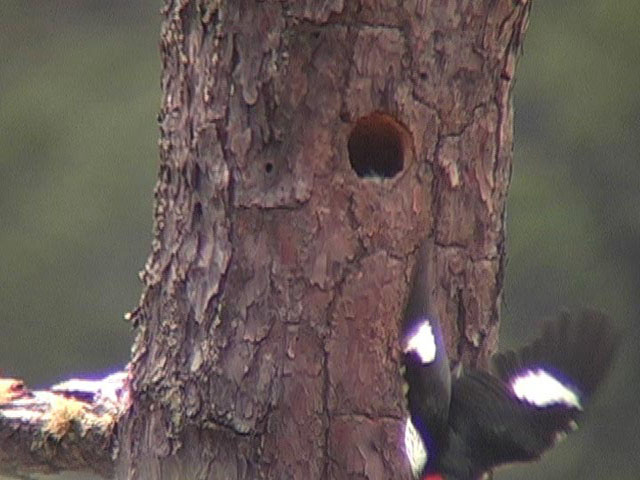
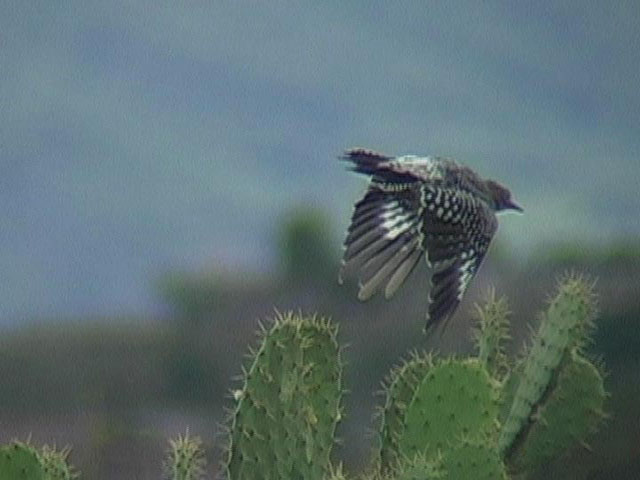
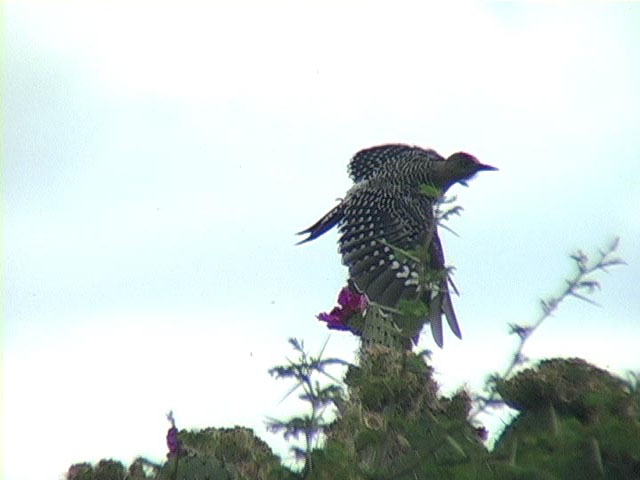
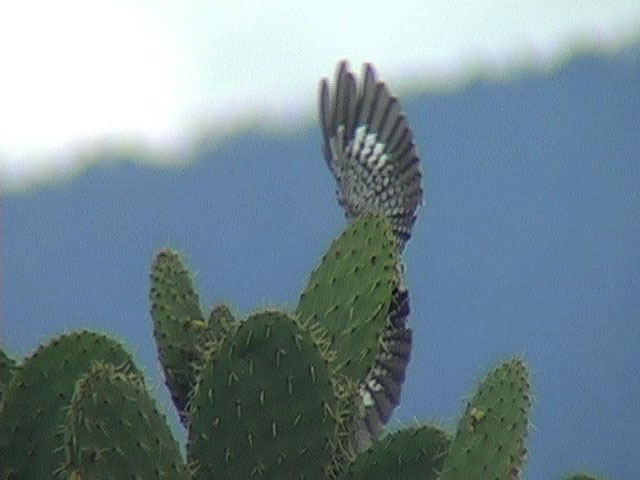
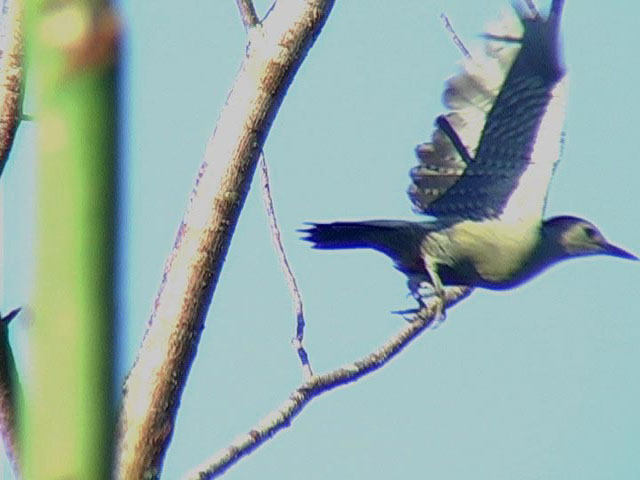
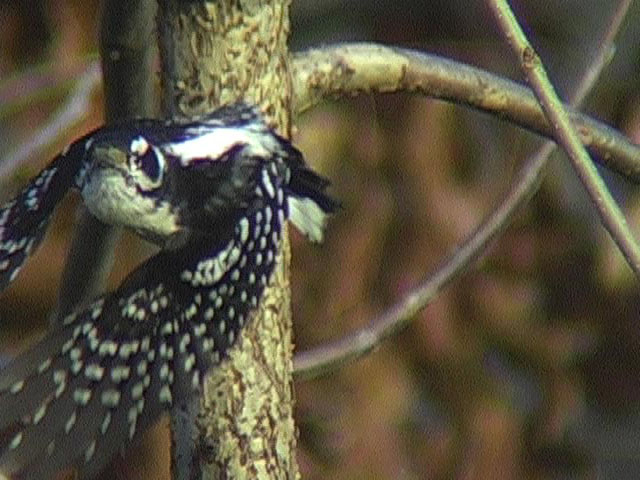
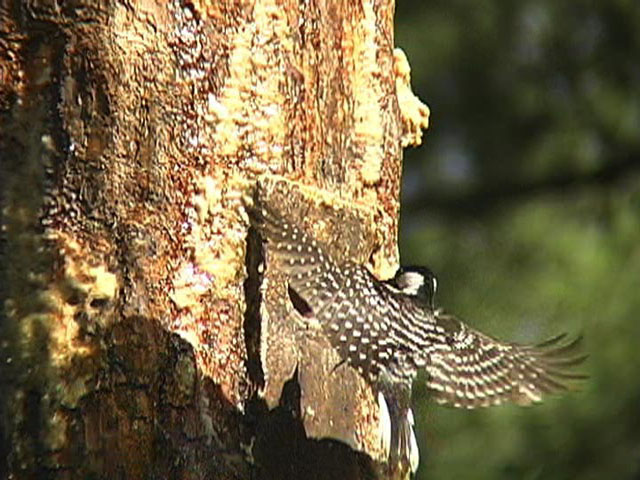
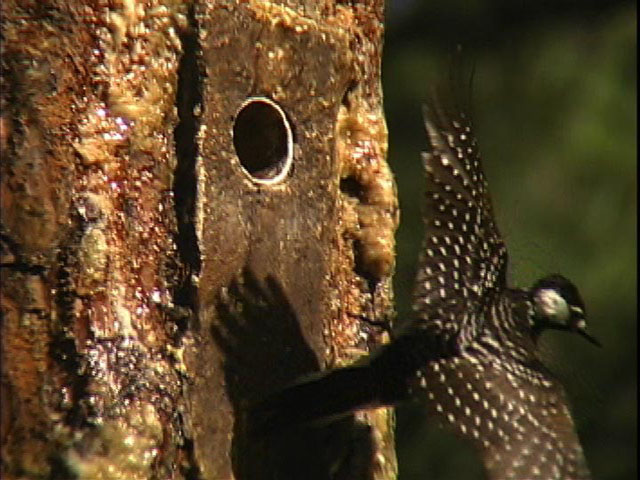
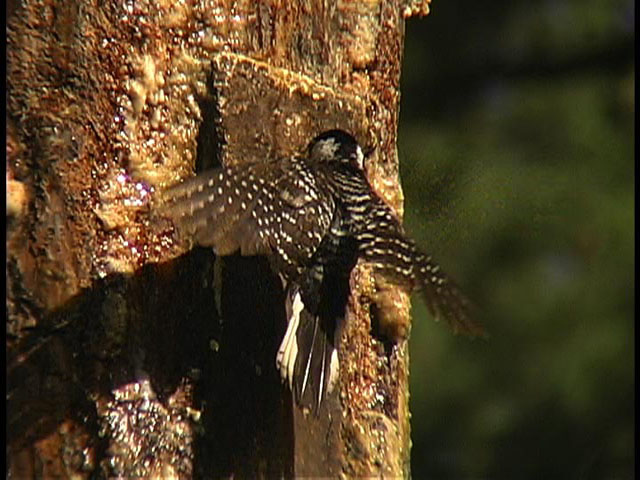
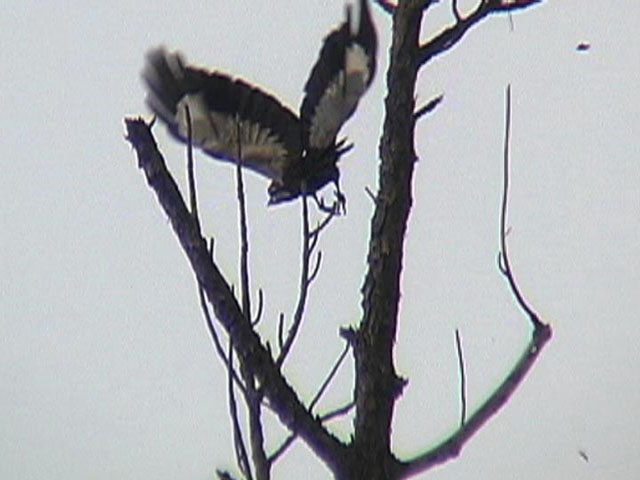
Cornell University is coordinating the search for Ivory-billed Woodpeckers in the Big Woods of Arkansas. Below and following clips of 22 species of woodpeckers are technical tips for shooting video to document physical and behavioral characteristics of the individual woodpecker(s). The tips include advice on extracting sharp "freeze-frame" pictures from video. Click the jpg links to see still frames extracted from video clips. The SLOW-MOTION clips were slowed to 2x or 4x the number of frames per second. They illustrate the merits of using high shutter speeds. Clips preceding the year 2000 were taken with an analog (not DV) Hi-8 videocamera, so I didn't create jpegs from their frames. More freeze-frame shots (of other birds) are shown at several links under
"FRAMES AND OTHER PICTURES" on the HOME PAGE .
|
SLOW-MOTION WMV MOV MP4 MPG RM SWF what when where state who
SLOW-MOTION WMV MOV MP4 MPG RM SWF what when where state who
SLOW-MOTION WMV MOV MP4 MPG RM SWF what when where state who
SLOW-MOTION WMV MOV MP4 MPG RM SWF what when where state who
WMV MOV MP4 MPG RM SWF what when where state who dubius SUBSPECIES WMV MOV MP4 MPG RM SWF what when where state who
SLOW-MOTION WMV MOV MP4 MPG RM SWF what when where state who
SLOW-MOTION WMV MOV MP4 MPG RM SWF what when where state who
WMV MOV MP4 MPG RM SWF what when where state who aeruginosus SUBSPECIES jpg1 WMV MOV MP4 MPG RM SWF what when where state who SLOW-MOTION aeruginosus SUBSPECIES WMV MOV MP4 MPG RM SWF what when where state who
WMV MOV MP4 MPG RM SWF what when where state who Yellow-shafted GROUP WMV MOV MP4 MPG RM SWF what when where state who SLOW-MOTION Yellow-shafted GROUP WMV MOV MP4 MPG RM SWF what when where state who Red-shafted GROUP WMV MOV MP4 MPG RM SWF what when where state who mexicanoides SUBSPECIES WMV MOV MP4 MPG RM SWF what when where state who
jpg1 WMV MOV MP4 MPG RM SWF what when where state who SLOW-MOTION WMV MOV MP4 MPG RM SWF what when where state who
SLOW-MOTION WMV MOV MP4 MPG RM SWF what when where state who DEINTERLACED SLOW-MOTION 60 FPS MOV (6 MB) DETAILED EXPLANATION what when where state who
|
|
__________________________________________
TIP 1. Use a videocamera instead of a still camera for these reasons: SHY, FOREST BIRDS ARE POOR SUBJECTS FOR STILL PHOTOGRAPHY. Until someone finds a nest or a low roost cavity facing the sun, your equipment should be able to capture images of distant, fleeing birds in poor light. Consider the fact that a still camera with a long lens requires a flash for virtually all shots, whereas a videocamera does not. BEHAVIOR IS BEST CAPTURED WITH VIDEO. Birds are alive! What else can I say? DIGITAL VIDEOCAMERAS (INCLUDING CHEAP ONES) CAPTURE 1440 TO 3596 FRAMES PER MINUTE, depending on NTSC vs. PAL format and interlaced vs. progressive recording. Any one frame may reveal subtle molt patterns and other characteristics that would help distinguish individuals. Some still cameras include video capability, but the video may be inferior to that achieved with a good videocamera. A GOOD ZOOM CAN COMPENSATE FOR LOW RESOLUTION. Although the frame resolution of most digital videocameras is 720 x 480 pixels and, hence, much less than 1 "Megapixel", videocameras like the Canon GL1 and GL2 have such a long focal length that you need not buy an expensive long lens, balance a spotting scope, or hold a bird in your hand to fill your camera's viewfinder and capture remarkable detail. To calculate how much a bird should fill your viewfinder to provide an adequate picture for printing, read the remainder of this paragraph: A bird or any other subject should span at least 2 inches on a printed page in order to be displayed prominently and with great clarity. Professional printing standards specify at least 120-150 lines per inch (that's printer jargon), which can be provided by a digital file of 300 dots for every inch of the printed material. Most birds sit diagonally instead of upright or prostrate, so a bird should span at least 600 diagonal pixels (for example, 424 pixels horizontally and 424 pixels vertically) within a digital image for that bird to be used in print. Such detail is greater than most bird images on the Internet. The outer x-y dimensions and the scan resolution of the digital image file are completely irrelevant to these calculations. (Beware that some image processing programs invoke an arbitrary scan resolution of 72 dpi for files that were not scanned into the programs, and this should be ignored.) The widest diagonal dimension of DV25, 720-HDV, and 1080-HDV videocameras is 865, 1469, and 2203 pixels, respectively. Therefore, a videographer should try to approach a bird closely enough so that it spans at least 69%, 41%, and 27% of the diagonal dimension of the viewfinder of those cameras, respectively, for their images to be used in print. If you use analog film, you will need to know the resolution at which a capture card scans your video for use in a computer. If you go directly from film to slide or print and don't intend to scan the slide for computer processing, your resolution is only limited by the grain of your film and that of the slide or print. __________________________________________ TIP 2. Choose your videocamera wisely. Look for the following features: SMALLER IMAGING ELEMENTS. For digital videocameras using CCD's or CMOS chips, you should look for 1/4, 1/5, or 1/6-inch CCDs or CMOSs instead of 1/3 or 1/2-inch CCDs or CMOSs. Experts generally suggest buying the latter (e.g., 1/3 or 1/2-inch), but they are looking out for the wedding photographer rather than the wildlife photographer. It is easier to cover a small imaging element with a distant subject than a large one because you need not approach your bird as closely. The color quality may be slightly poorer, but you gain by capturing more structural details. Choosing a videocamera with HDV resolution (e.g., 720 x 1080, and 2024 x 1050) over DV25 resolution (720 x 480) can counter the poor zoom ratios and the poorer magnification of large CCDs or CMOSs. However, you have a lot to counter because larger imaging elements tend to be associated with cameras having short focal lengths. Most if not all Sony DV25 and HDV cameras suffer from that combination. MULTIPLE IMAGING ELEMENTS. If you are able to purchase a camera with 3 CCDs instead of 1 CCD, you'll probably get better rendition of bright reds and yellows by eliminating blur or bleed of those colors on adjacent parts of each frame. This information may not apply to CMOS elements; I've seen at least one review that found a single CMOS handles color bleed better than 3 CCDs. Also, 3-CCD cameras tend to have slightly poorer automatic focus than 1-CCD cameras, probably owing to their need for slightly more light. LONG FOCAL LENGTH. Focal length is a term that applies to videocameras as well as still cameras. The electronic zoom value boldly enscribed on a camera body is artificial "pixel-doubling" or interpolation beyond the smaller optical zoom value. The optical zoom number enscribed on the camera body indicates the amount of magnification over the widest (zoomed out) lens setting. If a camera is designed for capturing an entire room of people, even a large amount of zoom may not overcome the small focal length of the camera, and hence it may not be useful for capturing distant birds. The real indicator of focal length are the two values that are typically enscribed on the ring of the lens, "4.4mm-44mm", for example. Dividing 44 by 4.4 yields 10, the optical zoom value. The number that a wildlife photographer should be studying is the larger value (in this case 44mm), which is the focal length of the camera. The larger the focal length and the smaller the imaging element, the more likely your woodpecker will fill your frames. The combination of the two values must be considered to evaluate what I call effective focal length. My Canon GL1 and GL2 videocameras have a maximum focal length of 84 mm, and they have 1/4-inch or 6.35mm-CCDs (measured diagonally). Because 84/6.35 = 13.22 and because I use a 2x tele-extender, I get an effective focal length of about 26.5 mm. The more expensive Sony VX2100 3-CCD videocamera has 1/3-inch CCDs and a 72mm focal length, yielding (with a 2x tele-extender) an effective focal length of only 72/8.47 x 2 = 17 mm, meaning that you'd have to approach a bird 36% closer to fill your video frames adequately. THE NEXT CALCULATIONS ARE TENTATIVE: The percent of a frame that a bird will cover may be calculated as follows (assuming maximum optical zoom): % of a Frame that a Bird Covers = (Bird Length * Focal Length) / (Distance to Bird * CCD size). If you measure how much a bird covers a frame, you can calculate how far the bird was from the camera (assuming maximum optical zoom): Distance to Bird = (Bird Length * Focal Length) / (% of a Frame that a Bird Covers * CCD size). All measures of distance, e.g., Length, Focal Length, CCD-size, and Distance to Bird should provided in identical units of measure. My only field test with my GL1 videocamera suggests multiplying the calculated distance by a fudge factor of 1.35, or multiplying the calculated frame coverage by a 0.74 fudge factor. Anyone know why? More calculations are in order if you are considering whether to purchase a regular DV25 videocamera or a new High-Definition Video (HDV) camera with resolutions such as 720 x 1280 and 1080 x 1920. An advantage of HDV is that filling your viewfinder isn't so important if a camera captures sufficient detail on smaller portions of your frames. Earlier I mentioned that a bird should span at least 600 diagonal pixels (e.g., 424 horizontally x 424 pixels vertically) in a digital image to satisfy professional printing standards. You multiply the "% of a Frame that a Bird Covers" calculated above by a camera's diagonal resolution (DV25 = 865 pixels, 720 HDV = 1469 pixels, 1080 HDV = 2203 pixels) to find out how close you need to be to a bird of a particular size to get 600 diagonal pixels on a video frame. Interestingly, my old GL1 (1/4-inch CCDs and an 84mm focal length) scores nearly as well as one particular 720-HDV camera that has 1/3-inch CCDs and a focal length of 72 mm! I hope Canon will produce a HDV Camera with an effective focal length that is comparable to their GL1 and GL2 digital videocameras. DV OR HDV. HDV resolves detail better than DV25, and records more chroma samples than DV25. But there are some serious drawbacks to HDV. (1) Televisions that aren't HDTV won't show the improvements. (2) Poorly focused footage and minor vibrations are more evident in HDV. (3) HDV has no more data per second than DV25, about 4 MB per second, because it is heavily compressed into a MPEG2 signal to fit on a DV25 tape. Recreational viewers do not normally see the effects, but rare-bird committee members who are looking for subtle details may decry the loss of information. (4) With HDV, if you lose a single frame because of a dropout, you will lose several other adjacent frames - sometimes as much as a half second of video. (5) The higher grade "made-for-HDV" tapes reduce dropouts, but this tape costs twice that as standard DV25 tapes. DIGITAL. Digital videocameras offer numerous advantages over older technologies, including the ability to put your footage in a computer (easily) and to make backup copies without any degradation of quality. Both the audio and video signals are encoded by the 1s and 0s that computers understand. High-quality film can be converted digital data that is better in some ways than video recorded with mini-DV videocameras. TAPE MEDIA. Some people are surprised to learn that most digital cameras use tape. Tape is excellent for most purposes because it is actually a 3-dimensional medium, so it can store lots of data in a small package. Avoid cameras that save directly to a DVD recorded within in the camera. Such cameras save the footage to these 2-dimension media using a compression format such as MPEG or MPEG2. The footage may look good, but your options for stabilizing the footage, enhancing brightness, contrast, and colors, or extracting individual frames are compromised considerably. Recent hard-drive videocameras may suffer from the same problem. Mini-DV footage consumes about 12 Gb per hour. So, if a digital videocamera stores several hours of video on a single DVD or 10-Gb hard drive, you may want to consider a different camera. TELE-EXTENDERS OR LARGER LENSES. Typically this is accomplished by screwing a 2x tele-extender onto one or more adaptor rings attached to the outer lens. Some cheaper cameras lack any means of attaching adaptor rings or filters "PROGRESSIVE" OR "FRAME" RECORDING. Contrast this with "Interlaced" or "normal" recording, whereby each alternate frame is combined with the previous (or following) frame to produce a full image. Interlaced video was invented for television to ensure smooth movement on the early, low-resolution sets. Some cameras can be toggled between progressive and interlaced modes, depending on your needs. Interlaced video results in twice as many frames as progressive video and can be helpful for capturing more images of a fast moth or dragonfly. However, the frames provide half the resolution of progressive video, so the interlaced recording is mainly suitable for creatures with coarse features (e.g., solid colors). Sorenson and other software that compresses video for distribution over the Internet typically remove interlacing, but the resulting compressed video typically has only half of the 60 original frames per second. MANUAL SHUTTER, MANUAL APERATURE, AND MANUAL GAIN. Semi-professional cameras offer the ability to adjust all of these functions manually. Higher shutter speeds help you stop wing beats so you can examine individual feathers. Many cheaper cameras don't show your shutter speed, much less let you change it. If you have such a camera, try setting it on "SPORTS" mode to help your camera stop action, at least in bright light. Stopped-down apertures help you reduce the amount of bleeding, washing-out, or over-exposure of white and bright colors. Slightly stopped-down aperatures also help you focus because of an increase in depth of field. Gain uses a mathematical function to brighten an image without brightening the darkest features. I use a modest amount of gain in nearly all my shots. I clarify the use of shutter speed, aperature, and gain in the tip about using your camera intelligently. STEREO MICROPHONE. I'd be surprised if any digital videocameras do not support stereo sound. What's more imporant is whether the microphone can "hear" all frequencies of distant birds. This sort of information is documented in the technical specifications of cameras. If a camera dynamically adjusts its sensitivity in response to loudness, you will want to keep that off, because it distorts the varying amplitudes of bird songs and calls. I have not compared the audio of various cameras, but I have been pleased with the stock stereo microphone and associated electronics of my Canon GL1 and GL2 cameras, although they pick up a trace of camera motor hum. A stereo microphone can be helpful in distinguishing two or more birds heard during binaural playback with headphones. The GL1 and GL2 pick up faint sounds that I don't hear, but my high-end has diminished in recent years, so I'm hardly an appropriate judge of audio performance. __________________________________________ TIP 3. Consider the following ancillary equipment, in descending order of importance. USE A TELE-EXTENDER. Or a big lens if your camera can support it (and if you are willing to carry it). Either increases the focal length by a significant amount. Using a tele-extender of 3x or greater can hinder a camera's auto-focus, add color aberrations, and produce vignetting (like looking through a tunnel with black sides). I use a Kenko 2x tele-extender, but I remove it to shoot birds at a window feeder or when shooting approachable butterflies. Vignetting will always occur at the wide end of the zoom range, but many more birds are far away than those that are close. FIND A LENS CAP FOR THE TELE-EXTENDER. If you're like me, you'll probably keep your tele-extender attached to your camera most of the time, ready to get the bird. Your camera's original cap won't fit on the tele-extender. The tele-extender may not include a cap, and if it does it may be a clumsy screw-on type. You want a slightly flexible cap that can be pulled off in a split second. Try different peanut butter jar lids. I bought 5 different jars before I found the perfect fit, and I keep a backup ready for when I lose one. Look for a cap that's red or yellow. USE A PROVEN BALL-HEAD. I wish I had the money to buy an Arca Swiss B1 Monoball head for smooth panning and quick lock-down. I waste a lot of time a tightening and loosening my head to center a briefly motionless bird in the center of the viewfinder. Of course, having a tripod head presumes that you use a tripod... USE A TRIPOD. Many cameras' image stabilization feature can eliminate the finest vibrations but not coarser movements of the human body. Computer software can smooth coarse shakes to graceful movements, reminiscent of a tree swaying in the wind, but software processing takes as much as a minute per second of footage. I've learned to love my tripod, and the next piece of advice ensures I carry it with me all the time. By the way, the staff at many archaeological sites (some of which are noted for their birds) may ask charge you a fee for bringing a tripod or videocamera, the official badges of a professional photographer. USE A TALL TRIPOD. Seek a tripod that, when fully extended, is significantly taller than you. More frequently than not, you will want to shoot a bird high in a tree or on a hillside. Crouching down to look up through the camera is no fun. USE A CARBON-FIBER TRIPOD. My Bogen / Manfrotto 055MF3 Magfiber Pro Carbon Fiber 3-Section Tripod Legs is (was) so light that I carried it everywhere. But replacing it (left behind in Veracruz by accident) is going to hurt. My friend Charlie Lyon gets great frames without a tripod, but the resulting shaking precludes hand-held footage from being included in many video productions. __________________________________________ TIP 4. Use your camera intelligently, taking advantage of its features. USE YOUR CAMERA'S FEATURES. Many people buy "prosumer" cameras like the Canon GL1 and GL2 cameras but don't take advantage of those cameras' great features. Left at its default settings, a semi-professional camera might not be much better than any other model. ADJUST APERATURE FROM WIDE OPEN. I like to stop down (close) my aperature a bit from wide open at f/2.6 to about f/4 to avoid wash-out or overexposure of very light features. Doing so also helps increase the depth of field and helps ensure a flying bird falls into the zone of focus. Unfortunately, any more improvement than "a bit" may result in too little light. ADJUST SHUTTER TOWARD HIGHER FRAME RATES. I try to shoot at about 1/1000 of a second, irregardless of the fact that only 30 frames per second are actually imaged and sent to the tape. For hummingbirds and flying insects, 1/4000 or faster stops wings nicely. ADJUST MANUAL GAIN. This is like image software's gamma setting, a "smart" contrast setting in which paler features are lightened relative to dark features. It may sound artificial, but it helps resolve details in each frame. Those of you who have examined raw satellite imagery knows that it is so dark that you see little but black. Software bring out its colors and contrast, and a camera's gamma adjustment works the same way. AIM YOUR CAMERA WITH YOUR HAND ON THE CAMERA. Many professionals prefer to use a handle stick mounted on the head to pan and tilt the camera, but I find that it reduces my ability to react quickly to a bird's movement. Holding the camera with your hand can shake the camera, but this is partly overcome by your panning. Which by the way, you want to avoid. Once a bird has stopped, and the camera is in place, I try to let go of the camera entirely. Here's the best part about a tripod: You can walk away from the camera while it's recording, quietly approach the bird, and record the bird as it flies from its perch, revealing rarely studied wing patterns and structure. __________________________________________ TIP 5. Take care of your tape and camera. MAINTAIN YOUR CAMERA. Several reputable manufacturers produce head-cleaning tapes. You insert one, play it for 10 seconds, and use it about every 20th tape. My GL2 warns me when a tape head is dirty or wet. If you are recording with a dirty head, you may not find out until you watch the tape, and the noise will be obvious as TV noise (on analog media) or blocky patches (on digital video media). You might consider sending your camera to an authorized service center for cleaning and alignment when you think your use has reach abusive levels. DON'T LEAVE YOUR TAPE IN YOUR CAMERA INDEFINITELY. I break this rule all the time, and I don't think I have ever had a problem. However, I'm careful to keep my camera in the shade or other cool spots, and I keep my camera in a protective case when not in use (always making sure it is turned off). Experts warn that tape can develop the problem spots when not wound or used regularly, so be forewarned. DON'T RECORD OVER OLD FOOTAGE. If you thought you could save money by re-using tapes, beware that the chance of tape "drop-out" (bad portions) increases when new material overwrites old material. Always use fresh tape in anticipation of important events and subjects. CONSIDER KEEPING YOUR CAMERA FOREVER. If you rely on your tapes for archival reasons (not recommended) you should be aware that slight alignment differences may prevent one camera from playing back tapes recorded by a different camera. You may eventually acquire newer cameras, but think twice before selling your old one. DON'T PLAY BACK YOUR TAPE IN THE FIELD OR EVEN FOR FRIENDS. Tapes can be destroyed by a variety of things, including playing them back (remember Murphy's law). Believe it or not, the most common way of losing material is our habit of rewinding to review recorded material and then failing to return to end of the recorded portion, leaving us succeptable to recording over the previously recorded material. So - don't review - and if you have taped something important, return as soon as possible to a computer, and upload your material so you have one or more copies on your hard drive(s). ARCHIVE YOUR MATERIAL APPROPRIATELY AND BACK IT UP. Although some cameras actually record to the MPEG format, MPEG is generally NOT an archival medium - it is a distribution medium. For most digital video material, DV25 is the appropriate archival medium. DV25 is the native format of DV25 or mini-DV cameras. The native of format of "prosumer" HDV is MPEG2. If film is converted to prosumer HDV, then MPEG2 is the resulting native format as well. I don't have any strong opinion about whether MPEG2 seriously compromises the data integrity of high-resolution video. Irregardless of what constitutes an ideal digital archive format, I keep my tapes, I keep the cameras that recorded those tapes, I keep DVDs of my best footage, and I keep my material on several hard drives stored in different states. __________________________________________ TIP 6. Shoot for interesting footage. SHOOT UNTIL YOUR BIRD FLIES. Getting a bird to land on a branch while you're shooting makes for a spectacular shot. Shooting a bird as it flies off can be nearly as dramatic AND is much easier to obtain. Avoid the temptation to swing your camera after the bird. Hold the camera still for a second after the bird flies off its perch. CONSIDER BACKING OUT A BIT ON YOUR ZOOM. No one cares if you capture pupils contracting and dilating as occasional clouds pass. Instead, frame your shots so you will capture a few beats of an entire wing span of a bird that flies off its perch. TWO IS BETTER THAN ONE. We are social animals. We like to see social birds. BE ALERT FOR UNUSUAL BEHAVIOR. The courtship behavior of most birds has never been videotaped or filmed. Be ready to catch 'em doing it. Of course, singing birds have their appeal, as well. KNOW YOUR BIRDS. The more you know about the species you are likely to encounter at a particular place, the better chance you have of getting memorable footage. Knowing vocalizations will help you select which birds to pursue. Learning songs and calls of different species is probably easier than learning the voices of different humans! How many people do you know? LISTEN FOR FLEDGLINGS. Recording a parent feeding its young is worth the hunt, as long as you maintain your distance. If the parent seems reluctant to approach, back off immediately. AVOID NESTS. Recording a nest is generally more trouble than it's worth. I'm embarrassed to admit that a pair of hummingbirds and a pair of hawks waited for a couple hours (!) for me to leave the vicinity of their respective nests - and I wasn't close at all! In that amount of time, I could have obtained great footage of several other birds. On the other hand, I once spent a whole morning shooting an active Azure-rumped Tanager nest in Guatemala, and nest-finder Jason Berry helped me seat myself about 30 meters away so the pair didn't know I was present. That species is a poorly studied, so there was some scientific justification for obtaining the video. As for more ordinary nests, you'll find yourself waiting a long time to get mostly boring footage. And incubation is really boring. (18 November 2005) |